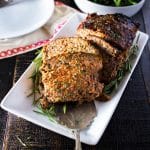
Description
This is NOT the crumbly gross 1950’s meatloaf. This is moist, succulent and savory meatloaf that melts in your mouth and leaves with feeling of nostalgia and comfort. This is my Turkey Meatloaf and it will be your new favorite after I show you how a few easy techniques and flavors can make this the superstar of your dinner.
Ingredients
Meatloaf
- 2 pounds ground turkey
- 1 large yellow onion (placed through the Vitamix)
- 5 ribs of celery (placed through the Vitamix)
- 3 medium sized carrots (placed through the Vitamix)
- 3 tablespoons rosemary (chopped finely)
- 1 cup breadcrumbs (I prefer Panko)
- 1 cup ketchup-divided
- 1/3 cup BBQ Sauce
- 1 tbsp Worcestershire Sauce
- 2/3 cup sour cream
- salt and pepper to taste
- olive oil to sauté
Green Beans
- 1 whole bag of FROZEN green beans.
- 1 tbsp olive oil
- 7 cloves of garlic (minced on the microplane)
- pinch of red pepper flakes
- salt and pepper to taste
Instructions
Meatloaf
- Preheat oven to 375-degrees.
- We start with throwing our carrots, onions and celery into a vitamix or a food processor. If you are using a vitamix, you are going to want to throw all your veggies in there (slice your onions and carrots in half lengthwise) and fill the container up with water until all the veggies are covered. Then pulse a few times until everything is finely chopped. You want this mixture to be fine because you do not want large chunks of vegetables in your meat loaf.
- Strain the liquid out of the veggies and place to sweat in a large sautee pan, with 1 tbsp olive oil, over medium heat. You do not want caramalization, you want them to be nice and translucent. Don’t forget to season them with some salt and pepper.
- In the meantime. take your rosemary and remove the leaves from the stems and chop up finely. Add to veggies.
- While the veggies are getting fragrant lets get the meat going. Add in the bread crumbs to the ground turkey. By the way, add this to your stand mixer mixing bowl, because later we will be combining all the ingredients in there.
- Oh and don’t forget to oil your loaf pan!
- After about 15 minutes of the veggies total cooking time, go ahead and measure out your sour cream, Worcstershire sauce and ketchup.
- Add it to the pan with the veggies.
- Mix thoroughly to combine.
- Taste and season accordingly. Remember you are also using this as the main source of seasoning and flavoring for your meat.
- Add the meat and bread crumb mixture to a stand mixer along with the veggies. Mix with paddle attachment until well combined. You can also do this by hand but I find this is way easier.
- Mix only enough to combine. Do NOT over mix. Take a small piece and fry it up to taste for seasoning. Season the meat as necessary.
- In another bowl, combine, 1/2 a cup of ketchup and 1/3 a cup of BBQ sauce. Mix to combine.
- Place your meat mixture into the loaf pan and slather the top with the BBQ and ketchup mixture. You can do so with a pastry brush. I actually had some meat leftover so I made little mini meatloafs as well 🙂
- Place loaf pan onto a sheet pan covered with foil in case the meatloaf decides to bubble out a bit. Fill ANOTHER pan with high sides (a foil pan is perfectly fine) with warm water and place on the oven rack directly BELOW the rack that you will be placing the meatloaf pan onto. This ensures that your top of the meatloaf will not crack.
- I always place a probe thermometer into my meatloaf so that I know when it is done. When it reaches 165-degrees your meatloaf is done…and glorious.
- Here’s another tip. Let. It. Rest. Covered with foil. And if you can, cool it in the fridge and THEN slice it. You will get perfect even slices that will not fall apart when cutting. Either way, use a serrated knife to get better slices. Want to know how restaurants get such beautiful, perfect slices of everything? Sharp knives and cutting while cool. Trust me on this one…it’s kind of fool proof.
Green Beans
- Pour oil into a large pan or pot over LOW heat.
- Add in minced garlic and chili flakes and allow to sweat. You do not want color. Continue this for about 2-3 minutes until garlic is wonderfully fragrant.
- Add in the FROZEN beans and toss to coat with the olive oil and garlic mixture.
- Increase the heat to medium.
- Add in salt and pepper. Once the beans have cooked through, remove and enjoy.
Notes
1. This very same recipe can be made with lean beef, bison or buffalo. I have made it with all of them…and they are ALWAYS amazing.
2. Trader Joe’s has the best French green beans (haircoverts as the French call them) in the frozen area. Otherwise just try and use the frozen green beans that are not cut in pieces. They just look prettier on the plate.
3. You want low heat because otherwise the garlic and chili flakes will burn.
4.Did you guys know that this is SUPER freezer friendly?! Make a double batch. Freeze it up then reheat it in the oven when you are ready to have it for dinner. Done and done!
5. The nutritional information is to be used for information purposes only.
- Prep Time: 20 minutes
- Cook Time: 50 minutes
- Category: Main Course, Meat
- Cuisine: American Nostalgia